Flipgrid ARientation Guide

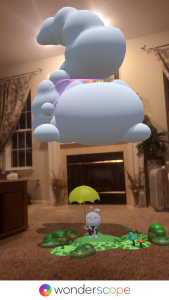
Flipgrid, the worldwide phenomenon and globally beloved edtech tool, has an extra-awesome feature that is becoming more and more popular for obvious reasons. It’s AR technology (that’s augmented reality), so it automatically has a mega-cool factor! In Flipgrid, any or all of the videos that are created can be printed as QR codes and scanned with the Flipgrid app. That’s when the magic happens.

The video appears – not a link to be clicked, but the actual video – and it appears to hover just above the surface of wherever the QR code is attached. You can literally pass your hand behind the video as it continues to play. THAT is #FlipgridAR!

When I show this technology to folks, I ask them to consider “the where & the why”. Not all Flipgrid videos need to be printed and placed somewhere as an interactive QR code. If the topic was an exit ticket for a lesson or a “How was your weekend?” kind of prompt, then it’s okay for those videos to just live in Flipgrid and be part of that classroom/community space on the web.

So that got me thinking about how “the where” really matters when using #FlipgridAR, and this project was born!

At the end of the first month of school, I asked a class of fifth grade students to help with a project.  I explained that for the past month, their teachers had done a lot of orientation – teaching and showing them expected routines and procedures. I asked for them to help create an ARientation experience for a new student. Using what they had learned in the past few weeks, I asked them to become the teachers, creating video clips that would strategically be placed so that a new student (or any visitor) could scan and learn.

My buddy Mr. Cho helped with this project, and he paired students, gave each a laptop, and a suggested an idea for their video. Topics included things like fire drill procedures, recycling at school, going to the nurse, homework policies, how to turn in finished work, rules for switching classes, navigating the cafeteria, and expectations for using the restrooms and even using the pencil sharpener.

The students really enjoyed brainstorming some of their own ideas for what a new student might want to know, and they really felt empowered to be the ones doing the actual ARientation! (Behold the power of student voice!) Of course, they also still love scanning those augmented reality QR codes for themselves, and pointing them out to any visitors to the classroom!

Below are two partial clips from their creative and non-scripted Flipgrid ARientation videos!


UPDATE:  Since I posted this two days ago, I’ve had a number of conversations with educators who are really excited about it!  Through these discussions, I’ve come up with several other ways and places we can all use #ARientation in our schools!  Here are a few other suggestions:

  • Whole School:  Have students create #FlipgridAR codes that can be posted at multiple locations around your entire school!  This will be perfect for new students and families, as well as school tours or any other visitors to your school.
    • School leaders – this could be a really awesome reward or motivation for certain students.  Be intentional in the way you choose students to have this honor of being an #ARientation Ambassador!
  • Special Area Classrooms:  #ARientation is great for the general ed classrooms, but it can really be extra-helpful in the special area classrooms such as the art room, a computer lab, or the library.  These are spaces that are used by ALL students in a school, so having augmented reality video guides throughout these learning spaces can be a really helpful way for newcomers to learn their way around.  (…or to remind not-so-newcomers about how things work!)
  • Shop Classes:  This goes along with Special Area classes, but I think it has an added usefulness:  safety lessons.  Imagine having a “How to use the band saw safely” video posted right on the band saw.  Having students create these #ARientation videos empowers them to model the safety precautions and directions for use that any CTE teacher will expect throughout the year.
  • Weight Room:  Once again, it’s about safety, and modeling the proper use of equipment.  Physical Education teachers may even require students to watch the #ARientation videos before they begin using equipment.  If you want to take it one step further, print the collection of #FlipgridAR QR codes, put them on a paper or digital document, require users to watch all of them, and then create a quiz based on what they have viewed.  You could require a passing score as part of your safety onboarding protocol.


ONE MORE THING:  There are so many ways to “spruce up” your #FlipgridAR QR codes.  I use PicCollage on my phone to crop the QR code image and then place it on colored backgrounds with stickers or text around it.  There are many apps and websites that will allow you to do the same thing.  Snip & crop the QR code, drop it on a doc or a slide, add some decorations, and you’ve got yourself a seriously snazzy display for #ARientation!

Whereby…A New Name has Appeared!

I have been a longtime fan of a website/app called appear.in.  I’ve probably taught thousands of people about it over the years.  Well, as of August , they’re changing their name.  The new name is Whereby, a play-on-words decision that emphasizes the company’s vision to allow people to choose WHERE they want to meet and work BY using tools that allow them to collaborate.

If you have an account with appear.in, no worries.  They’ve automatically migrated your account and you can still use your site with the appear.in/_____ domain address for now.  However, after September 1, you’ll be switched over to your new Whereby domain address, which will just have the new domain prefix.  (see image below).

whereby url

If you’ve never used it, like I said, the site is basically a virtual meeting room.  It is, in fact, the EASIEST virtual meeting room experience that I know.  I recommend it far and wide to users of all ages and “digital abilities” because there just is no simpler way to connect directly via video chat.   To set up your own account, you just go to the website, choose an available username, and once you submit, you OWN that room forever.  What you really own is the URL, the website – it is forevermore unique to you and all you have to do is share it with someone and be on the site as the same time as the other person/people.  For example, if I choose the username HappyFaceSmileGrin, then my room will be whereby.com/HappyFaceSmileGrin.  If I tell my friend Sally to meet me in that room (go to that URL/website) at 7pm EST, we will literally be in a video chat room immediately when the website opens.  That’s it.  No logins, no remembering passwords, no guest access QR codes…just go to the same site at the same time.  Up for 4 people can meet in a room at a time (for free).

There is a way for the owner to “lock” a room, which requires the visitor to “knock” virtually, which prompts the owner to look through a virtual peephole, see who wants to enter, and permit entrance.  I definitely advise keeping the lock on.  If you want to keep it unlocked most of the time, selecting a really unique but easy-to-remember username will also help strangers from randomly accessing your room!

Whereby says that they’ll be making a few more changes, including a new “new visual profile” to go with the new name.  Their blog also reports that they’ll be making some  updates to the platform.  I’m keeping my fingers crossed that there are still quality options available for people who want to use the free version.  Change can be a good thing, whereby we all benefit from thoughtful upgrades and a new look!

Read more about the reasons behind the change on their blog post.

Spice Up Your Session Board… with Flipgrid’s Augmented Reality QR Codes!


Edcamp Flipgrid QR codes

I’m a mega-fan of edcamps!  I attend them as often as I can, and I also help to organize one called Edcamp Happy Camper here in southern New Jersey.  I love being able to choose my own learning, and I love watching a session board fill up with the ideas and inspirations of each diverse group of educators.  At an edcamp, you never know what the sessions will be until you get there!

Well, I’ve learned that sometimes edcamp attendees STILL aren’t really sure what the sessions are even after they’re posted.  There have been many times that I’ve heard someone say, “I would have gone to that session, but I didn’t really know what it was.”  Look at the sample session board above.  There are several session titles that might not be known to some, and many attendees will avoid those sessions rather than finding someone who can explain it to them.

Enter Flipgrid’s QR codes – made even cooler by the new augmented reality feature!

It would be easy for edcamp organizers to quickly add a little QR code to each posted session.

  • Prior to the edcamp, quickly set up a grid on Flipgrid (name it after your edcamp) and subsequently create a topic called Session Board.
  • You will need a printer nearby so you can print the QR codes right away. You could also use one of these adorable little HP Sprocket portable printers that prints 2×3” stickers instantly through an app.
  • As people come up to post session ideas that they want to facilitate, have one edcamp organizer stationed by the session board who will ask that person to record a quick 30-second synopsis that explains their session.
  • Print the QR code to that video and stick it to that posted session (as shown in sample session board graphic above.)
  • Put the link to the entire TOPIC on the digital version of the session board, so that throughout the day attendees can watch the synopsis videos from wherever they are during the edcamp.

At your edcamp, be sure to make an announcement that people can use their phones to scan the QR codes.  The new AR feature of Flipgrid’s QR codes will make these videos really POP…so be prepared for lots of ooohs and aaahs!

—————————————-

Thanks so much for reading!  I’d really love to hear your thoughts, suggestions, and feedback.  You can always reach me on Twitter as @kerszi, on my Facebook page called Integration Innovation, or right here on my blog!

QR Codes: How Can I Use Those? 

Well, QR codes are most easily used with iPads, tablets, or mobile phones to be honest, but I do have a cool link for use with laptops (with front or rear facing cameras) that works great: webqr.com. 
I thought I’d drop a handy link here for those of you who want to start exploring some fun ideas on your own: 28 Interesting Ways To Use QR Codes 

🔵 My favorite QR code generators/makers:

  • To make customized really pretty QR codes with a picture of logo in the middle, try: QRCode Monkey

🔵 A few more excellent links:

(This blog post is an adapted excerpt from a newsletter I had published for district staff in February 2016.)

Orb App: Augmented Reality Meets 3D Design

I have a little fun tonight with a new app. The app is free, and it is called Orb.

If you’re good at using 3-D design sites like Tinkercad or Morphi or SketchUp, you’re probably going to enjoy this app just for the sheer novelty of it. It lets you create exactly those 3D kinds of designs (using just five basic shapes), but you can overlay them on real life backgrounds as you create, because it all happens in augmented reality.

When you first launch the app, you’re greeted with this screen:

There are samples that you can view in a variety of categories, all of which are better than what I can do!

The design elements in this app are notably few, but still…I admire anyone who is skilled at creating in 3D. This app is a fun way to practice…wherever you may be. Because it’s augmented reality,you can literally get up and walk around your design as you’re building it, which is pretty cool!

In my family room tonight, I made this – ummm – well, I wasn’t sure what to call it when I saved it, so I called it “Odd Clown”. I’d say that’s fitting, wouldn’t you?

The options are really basic, but here’s a breakdown of what is where and what it’s supposed to do:

My overall review of Orb is that this is fun and definitely an exercise in building in 3D. The AR component adds an element of “I can build anywhere” frivolity. The downside for me is that there’s really no way to export your design into any other program, so there’s not much of an overall functionality. I can’t 3D print it, I can’t put it on a Merge Cube, and I can’t get it into PowerPoint as a 3D object, so it just lives the in Orb app and can be added to the public Orb gallery for others to enjoy. Enjoy is the key word here – this app is just something to enjoy.

Parting thoughts:

  • This would definitely be a cool addition to iPads in a makerspace. I think maker kids would really get into this, especially if they could get up and move while they collaborate and share design ideas.
  • It’s fun for elementary through adult, but more seasoned 3D designers will be frustrated by inability to export
  • The learning curve is small, but users definitely improve with lots of practice.
  • I wish it had a record and/or photo button.
  • I hope they add more shapes.
  • Free apps aren’t always worthwhile, but this is worth a shot. It’s fun!

Give it a go and let me know what you think. You can screenshot your Orbs and share them with me on Twitter at @kerszi or on my Facebook page called Integration Innovation.

Summer is Here! It’s Time For Some #SPF20

I’ve been in education for about 30 years, but today happens to be the last day of school of my 20th year working in my district. I’ve done a lot in 20 years here. I taught special education resource room and in-class support. I taught every elementary grade level. I was an elementary computer teacher, and I’ve been a district Technology Integration Specialist for the past three years. I ran a STEM Club called STEAMMakers. I’ve brought in new programs, secured grants, and started district-wide initiatives. I even went back to college and got certified as a school administrator three years ago.

I couldn’t have done all of this if I didn’t fully embrace a perpetual love of learning. I am ridiculously addicted to learning new things – to keeping my mind active, staying cutting edge, and continually working toward self-improvement. It really is an obsession. But there’s more – I have a second “affliction”. I am insatiably passionate about teaching it all to others.

The teachers throughout my district depend on me to be an edtech expert. I serve as a team mentor and bring new resources, skills, ideas, and learning to the other Technology Integration Specialists in my district. I now own my own edtech consulting business, Integration Innovation, LLC. I do presentations for thousands of attendees nationally and even internationally. I owe it to all of these people to stay current and really be a powerhouse resource for edtech learning.

So on this first day of summer of my 20th year in my district, I’m kicking off this summer by setting a goal called #SPF20. It stands for summer professional fun! The fun part is obvious, and the 20 means that I intend to learn or deepen my learning of 20 edtech things by the time I go back to school. Some of these things are brand new to me, and have just been things ‘on my radar’ that I knew I wanted to learn when I could find the time. Many of these goals are platforms or tools with which I’m already familiar, but I really want to dive deeper and become more of an expert. I also want to curate dynamic presentations based on what I learn.

Why 20? Well, it is originally inspired by the celebration of my 20th year in one district, but it’s also based on the fact that I have just about 10 weeks of summer vacation. That means that I can pointedly learn two new things each week. I first I thought that number sounded too low, but the more I thought about it the more I realize that it’s a really good balance. If I had made it #SPF50, I’d dabble in a lot, but not really become an expert at anything…and I’m craving expertise this summer. Balance is something I’m working on in my life, so 20 it is! If I learn something new on a Monday, and something else on Thursday, I have all those other days of the week to:

    Just spread out the learning – go deeper into my inquiry, or just wake up the next day and explore things I wondered about after reflecting
    Reach out to other friends and folks on Twitter who use these sites or tools and ask questions, and maybe even schedule in-person or virtual meetups to explore and learn together! (I would really love this!)
    Contact the vendors with any questions I have, request demos, or just build good relationships with them
    Curate presentations and resources to share with colleagues
    Take a day or two off when I just want to! I need some pool days in the sunshine, fishing trips, beach days, and down time with my family, too!

How am I going about this #SPF20 thing? Well, I have a list. I REALLY like my #SPF20 list – it is ambitious but inspired! To be honest, it’s not quite finished yet, but I have about 15 things on there so far. I’m saving some open spots until after ISTE in late June, where I’ll meet all kinds of people who will undoubtedly inspire me to learn things I haven’t yet even considered. I was going to schedule the items from my list on the calendar, but I realized I want the flexibility and freedom to decide what I’m going to learn week by week…it IS summer, after all! So the list and the learning will remain fluid.

So I’ll be using #SPF20 liberally this summer. I’m always up for having learning buddies – so if you want to teach me cool new stuff, learn with me, or just suggest something I should put on my list, I would love it! I don’t yet know if I’ll blog as I go along, or post to Twitter using the hashtag #SPF20, but I’m open to your ideas and input about that, too. And hey, if anyone else wants to hop on this hashtag and create your own list (or share mine), let’s rock some #SPF20 together!

Oh, and I’m reserving the right to up that #SPF level… extra coverage, ya’ know?

Learning In The Loo – Where It All Began

I stated this fun little edtech toilet training trend called “Learning in the Loo” many years ago.  Back in 2004-2008, I taught 5th grade Social Studies.  I started creating these Learning in the Loo posters for my students as a kind of study guide before our big benchmark tests.  As you can imagine, they were initially met with groans and awkward giggles, but the students quickly came to love them!  I hung them in the student restrooms inside all the stall doors, and yes, above urinals.  At first, I noticed a spike in the amount of bathroom visits, but guess what – I also noticed a real increase in student discussion about the topics, and also in test scores! With a “captive audience” and clear, purposeful information, it really worked effectively as a learning and reinforcement tool.  The students came to enjoy it so much that I eventually turned over responsibility for creating these Learning In The Loo posters to them – talk about pride in ownership!  I still have former students remind me how much fun we all had with that, and how they really DID “learn in the loo”!

Since then, I became an elementary school computer teacher, and am now a Technology Integration Specialist.  As an edtech leader in my schools, I knew that value that these Learning in the Loo posters could have on learning, but in my new role, my ‘students’ are teachers and my content is edtech.  So about 10 years ago, I began creating edtech tips, tools, and tidbits for teachers and hanging them in faculty/staff bathrooms.  I still called it “Learning In The Loo”, and the initial reaction from grown-ups was just the same as it was with the kids…groans and awkward giggles.  Soon enough, though, people started loving it!  To this day, I have staff remind me when I forget to update them.  I’ve had teachers suggest all kinds of topics.  I get tons of emails and conversations with teachers all the time who tell me that they tried something that they “learned in the loo”.  I’ve even recently had one or two brave souls admit that scanned a QR code to access bonus content while they were…ummm…in there.

Back in 2016, I started sharing Learning in the Loo as part of presentations I was doing outside of my district.  I had a favorite presentation called “Innovative Tech PD and Integration”, which I first shared at Bacon Bytes conference in Millville, NJ.  I think every single person who attended ran back to their schools and started creating Learning In The Loo opportunities for their own staff!  I had so many follow-up emails, tweets, and messages about it that I immediately created the now-famous Twitter hashtag #LearningInTheLoo, and soon after developed a Padlet so that everyone who was doing this could share and borrow ideas! There are now hundreds of crowdsourced ideas on that Padlet, thanks to a generous and creative #LearningInTheLoo community!

Well, needless to say, this has REALLY caught on – thanks to Twitter!  If you’re interested in trying it, take a look at the #LearningInTheLoo Padlet and help yourself to ideas that are there.  That’s what it’s there for.  When you’re ready, you can pay-it-forward by sharing creations of your own.

You can also get a lot of additional ideas by searching the hashtag #LearningInTheLoo on Twitter. ⚠️ I will say that a few folks have kind of tried to rebrand this idea with a different hashtag or two, including #ToiletTalk and even #PottyPD.  As a true educator, I think sharing in any form is great, but I also believe in proper attribution, so I always kindly direct people back to the original hashtag and the original idea.  You’ll often notice that when I tweet my standard post about #LearningInTheLoo, I immediately follow it with a tweet that links back to another post I’ve written called Innovate, Emulate, Duplicate…A Digital Citizenship Discussion. It’s just my subtle reminder to celebrate good digital citizenship among educators. Oh, and if you see a really awesome Loo idea posted out there on Twitter, no matter the hashtag, you can help the “movement” by kindly asking the poster to share it over on the #LearningInTheLoo Padlet so that we can all benefit from sharing and having a giant collection of crowdsourced resources all in one place!

I very much look forward to seeing your Padlet contributions to our #LearningInTheLoo community! 🚽

Thanks so much!
Kathi Kersznowski  ( @kerszi )

Merge Cube: Curricular “Magic” With The Explorer App

WHOA! 😲You’ve just GOT to see this! There is 🔮magic🔮 in this cube, I swear! Check out this quick video I made to see some of the new awesomeness brought to us by our friends at Merge!

Note: I am sharing this video that I created today, but there are folks around the world who are taking Merge skills to a whole different level! I am in awe of the creators, those who are curating new AR and VR material…..and even better – those who are teaching students to curate new AR/VR material to inspire all of us! Our friends at Merge are opening whole new worlds and learning possibilities for us. They are to be commended, congratulated, and thanked.

I am just a newbie…I’m standing back and am just awestruck by all of it. I’ll keep sharing the things that I’m able to understand, and hope to guide a few newcomers along on my journey. The most profound thing that I’ve learned is that it’s all attainable – everyone can do this at some level.

Let’s Merge together.

Wonderscope: This App Really Brought Me Joy!

I found a wonderful and fun new app tonight! It’s not like anything I’ve ever seen before, honestly. It’s a colorful, inviting, interactive experience in which augmented reality meets cartoon stories. The app is called Wonderscope, and it looks like this:

The app itself is free, and so is the first story, which is called “Wonder’s Land”. From the moment you first open the app, an adorable little animated critter named Blob starts talking to you, and he’s just adorable in the way he prompts you to allow microphone and camera access. After all of those preliminaries are set up, the screen pictured below appears, and you can begin your first Wonderscope story!

The experience begins by asking you to find a flat, well-lit surface, and on-screen prompts help you to find just the right spot. Then, the story begins. In this particular story, we meet a main character named Wonder. He’s animated and talks directly to you as he narrates the story. Throughout the interactive tale, you will be prompted to read short sentences or phrases that appear on the screen, and as you say them, you’re making things happen in the story! Of course, it’s all happening in augmented reality, so the animations are superimposed over your real-life living room (classroom, yard, etc) in the background.

It took me 10-15 minutes to get through the story, mostly because I just took my time with the experience. I’m enthralled by anything that’s augmented reality, and I was just mesmerized by the colorful detail, the speaking voices of the characters, and the interactive features that appeared! (I was able to spin that Ferris wheel pictured above.) This app really brought me joy!

Like I said, the app itself is free and so is the story (Wonder’s Land) that I experienced. It looks like they have two other stories currently available for purchase (on sale $1.99 each, regularly $4.99), and one that’s in development.

At this point, there are only three minor issues that I’ll present for your consideration:

  1. Younger children may need help to read on-screen prompts.
  2. There are only three completed stories at this point. (But I’ll definitely be keeping an eye on this app. I have a feeling it will do quite well and they’ll be able to develop more awesome stories!)
  3. The only other issue I can see is that the cost per story may be a purchasing roadblock for many schools.

All said, the Wonderscope app is definitely engaging and incredibly well done! Children (and adults) will surely enjoy immersive AR story experiences with Wonderscope!

Teach Empathy and the SDGs By Connecting With A Partner Classroom

I’ve become incredibly passionate about connecting students globally using technology. I’ve seen the impacts of what this can do for students and the profound impact it can make on these little human beings that we teach!

When our students are able to meet students that look, learn, and live differently than they do, eyes open and perspectives change. They find so much in common, but also celebrate and appreciate differences. They marvel at new information and new ways of thinking. They feel pride in sharing about their communities and schools. The shy kids become a little less shy when they have the chance to speak and share in the comfort of their classroom but the “safety” of just using video to communicate. They feel validated and uplifted when a class across the country or halfway across the world acknowledges “Yes, we hear you and we feel that way too!” Students find their voices, and often find so much more.

If we as teachers embrace and unleash the potential of these connections, we can take students far beyond the introductory stuff (How long is your recess? What books are you reading? How cold/hot is it where you live? Whoa…you like Fortnite, too?) and we can eventually structure these video chats around some serious global issues! We can use this technology to communicate and collaborate with other classes to teach the Sustainable Development Goals (SDGs) and inspire our students to action!

I created the chart above to show how that progression – that deepening of purpose – can happen.

We have free and brilliant technology tools to make these connections possible. My three favorites are:

  • Empatico – for elementary schools, you enter your grade level, location, availability, and activity choices (they have 9 so far) and Empatico magically finds you a partner classroom with the same interests! You are matched with another class somewhere in the world, and when you are ready, you launch the video chat right within the website – it couldn’t be easier! My entire school district is using Empatico in our 175+ elementary classrooms and it has truly brought the world to our students.
  • Skype in the Classroom – If you haven’t checked out the Skype in the Classroom site, please click on the link! In addition to virtual field trips and guest speakers, you can always find classes, teachers, and projects. There are so many choices and connections from all over the world, and Skype in the Classroom is always adding new things! Oh, and follow them on Facebook too – they have a thriving community of educators who are always reaching out and looking for unique connections.
  • Flipgrid (Grid Pals) – The amazing and wildly popular Flipgrid is widely known for its power to amplify student voice by allowing students to create video responses to prompts or topics – and kids LOVE it! Well, Flipgrid has a unique use that you may not have considered. It can basically work as an asynchronous option to connect and communicate with classes in time zones with which you wouldn’t typically be able to connect! They have a whole section on their website that explains how to use something called GridPals to find connections.

As an ambassador and enthusiast, I’d be happy to help you learn how to use any of these sites, or give you more resources to teach the SDGs, or put you in touch with others who are really passionate about this work, too! Let’s do this together. Share the chart above and linked resources with colleagues. Then, let’s all give our students the greatest gift of all – exposure to global classrooms and global issues that inspire action – and empathy.